
There are few kitchen accomplishments more rewarding than pulling a beautiful, golden-brown loaf of bread from your oven—especially when that loaf required absolutely no yeast, no kneading, and minimal effort. This Amazingly Easy Irish Soda Bread is the recipe that transforms hesitant beginners into confident bakers and gives seasoned cooks a reliable go-to when they need homemade bread in a hurry. With its crackly crust, tender crumb, and distinctive tangy flavor, this traditional Irish quick bread proves that you don’t need complicated techniques or lengthy rising times to create something truly spectacular.
What makes this particular loaf so special is its remarkable versatility and forgiving nature. The dough comes together in minutes with nothing more than a bowl and a fork. There is no waiting for dough to rise, no punching down, no shaping expertise required. Yet the result tastes like something you spent hours perfecting—a rustic, hearty bread with a character all its own. The exterior bakes to a deep golden brown with that signature cross cut across the top, while the interior remains soft, moist, and just dense enough to hold up to generous slatherings of butter or your favorite jam.
Whether you are serving it alongside a steaming bowl of Irish stew for a authentic St. Patrick’s Day celebration or simply enjoying a slice with your morning tea, this bread delivers comfort and satisfaction in every bite. Let me guide you through the simple process and share everything I have learned about achieving soda bread perfection.
Why This No-Yeast Bread Deserves a Permanent Place in Your Repertoire
Irish soda bread has sustained families for generations, and its enduring popularity speaks to its brilliant simplicity. Understanding the fundamentals behind this recipe will not only help you execute it perfectly but also give you the confidence to experiment and make it your own.
The Chemistry of Soda Bread
Traditional Irish soda bread relies on a chemical reaction rather than biological leavening. When baking soda (sodium bicarbonate) encounters an acidic ingredient like buttermilk, it immediately begins producing carbon dioxide bubbles. These bubbles expand in the oven’s heat, giving the bread its rise and creating the characteristic tender crumb.
This reaction is why soda bread is classified as a “quick bread”—the leavening happens instantly, eliminating the need for proofing time. It is also why timing matters: you want to get the dough into the oven as quickly as possible after mixing to capture as much of that initial gas production as possible.
The Beauty of No-Knead Dough
Kneading develops gluten, the protein network that gives yeast breads their chewy structure. For soda bread, however, we want the opposite effect. A tender, almost scone-like texture is the goal, and that requires minimal gluten development. By handling the dough gently and briefly, we ensure the finished loaf remains soft and appealing rather than tough and rubbery.
This no-knead approach also means the dough comes together in under five minutes. You will spend more time waiting for the oven to preheat than you will actually working on the bread.
What Sets This Recipe Apart
After baking countless loaves over the years, I have refined this recipe to achieve the ideal balance of textures. The secret lies in two small but significant details. First, using cold butter and working it into the flour until pea-sized pieces remain creates tiny pockets that steam during baking, contributing to a more tender, almost flaky interior. Second, allowing the baked loaf to cool completely before slicing—as difficult as that may be—prevents the gummy, undercooked texture that plagues hastily cut bread.
Ingredients for Amazingly Easy Irish Soda Bread
One of the many virtues of this recipe is its short, accessible ingredient list. You likely have most of these items in your kitchen already.
The Essential Ingredients
All-Purpose Flour (4 cups / 480 grams): Provides the ideal structure for soda bread. Its moderate protein content creates enough support for the rise without producing excessive toughness. Avoid bread flour, which will make the loaf dense and chewy.
Baking Soda (1½ teaspoons): Your leavening agent must be fresh for proper rise. To test freshness, drop a small amount into vinegar—vigorous bubbling indicates it is still active.
Salt (1½ teaspoons): Far more than a flavoring agent, salt strengthens the gluten structure and regulates the baking soda’s reaction. Do not reduce it.
Buttermilk (1¾ cups / 420 ml), cold: The acid in buttermilk activates the baking soda and contributes the bread’s signature tang. Full-fat buttermilk yields the richest results, though low-fat works beautifully as well.
Unsalted Butter (4 tablespoons / 56 grams), cold and cubed: Adds richness and tenderness. The cold butter creates steam pockets during baking, enhancing the texture.
Optional Enhancements
While traditional Irish soda bread is admirably plain, this recipe welcomes additions. Consider incorporating:
- 1 to 2 tablespoons of sugar or honey for a slightly sweeter loaf that browns more deeply
- 1 cup of raisins or currants for the classic “spotted dog” or railway cake variation
- 1 tablespoon of caraway seeds for authentic Irish flavor and gentle anise notes
Step-by-Step Instructions for Perfect Soda Bread
Preparing Your Workspace
Position a rack in the center of your oven and preheat to 400°F (200°C). Line a baking sheet with parchment paper or dust it lightly with flour. Soda bread bakes free-form, so no loaf pan is required.
Mixing the Dry Ingredients
In a large mixing bowl, whisk together the all-purpose flour, baking soda, and salt. Whisking aerates the flour and ensures the baking soda is evenly distributed—critical for consistent rising.
Add the cold, cubed butter to the flour mixture. Using your fingertips or a pastry blender, work the butter into the flour until the mixture resembles coarse meal with some pea-sized butter pieces still visible. These larger pieces are intentional and contribute to the bread’s tender texture.
If you are including any additions like raisins or caraway seeds, add them now and toss gently to coat them in flour. This coating helps prevent them from sinking to the bottom of the loaf during baking.
Incorporating the Buttermilk
Make a well in the center of the dry ingredients. Pour in the cold buttermilk all at once. Using a fork or your hands, stir and mix just until the dough comes together. It will look shaggy, craggy, and slightly sticky—this is exactly what you want. If there are dry bits at the bottom of the bowl, you can add an additional tablespoon of buttermilk, but be cautious not to overwork the dough.
Shaping the Loaf
Turn the dough out onto a lightly floured surface. With floured hands, gently bring the dough together into a round shape. This is not the time for firm pressure or repeated handling. Gather it gently, rotate it to create a smooth top, and stop. The dough should hold together but still look rustic and irregular.
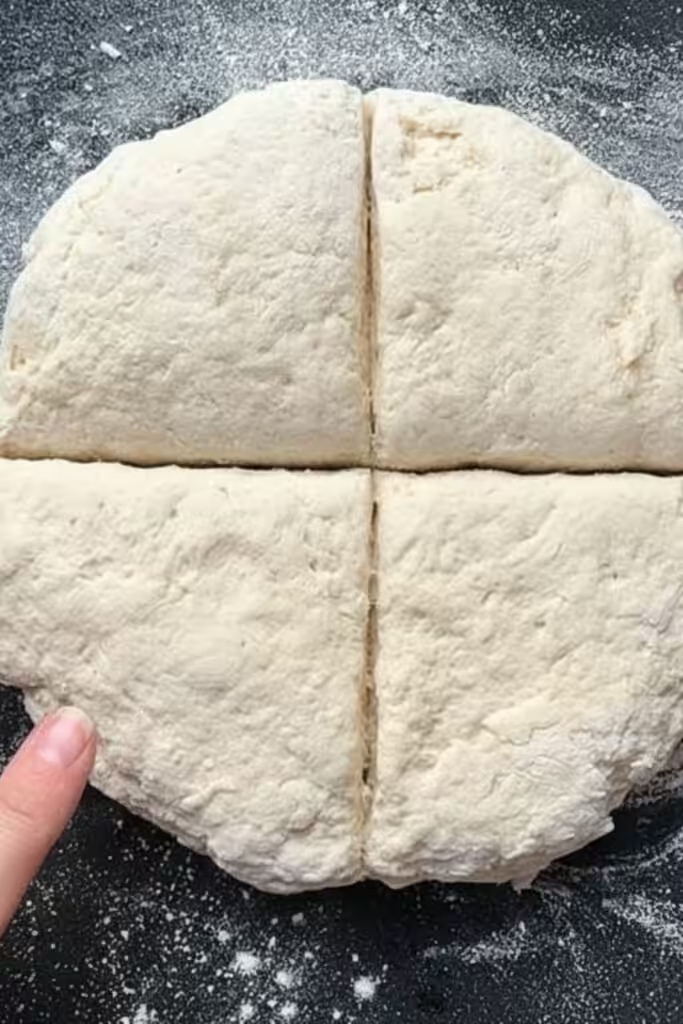
Transfer the dough round to your prepared baking sheet. Using a sharp knife or lame, cut a deep X across the top of the loaf, cutting about halfway down into the dough. This iconic cross serves multiple purposes: it allows heat to penetrate the dense center, prevents the sides from bursting unpredictably, and creates the traditional “farls” or quarters that can be easily separated after baking. In Irish folklore, the cross was also said to let the fairies out—a charming reminder of the bread’s cultural heritage.
Baking the Bread
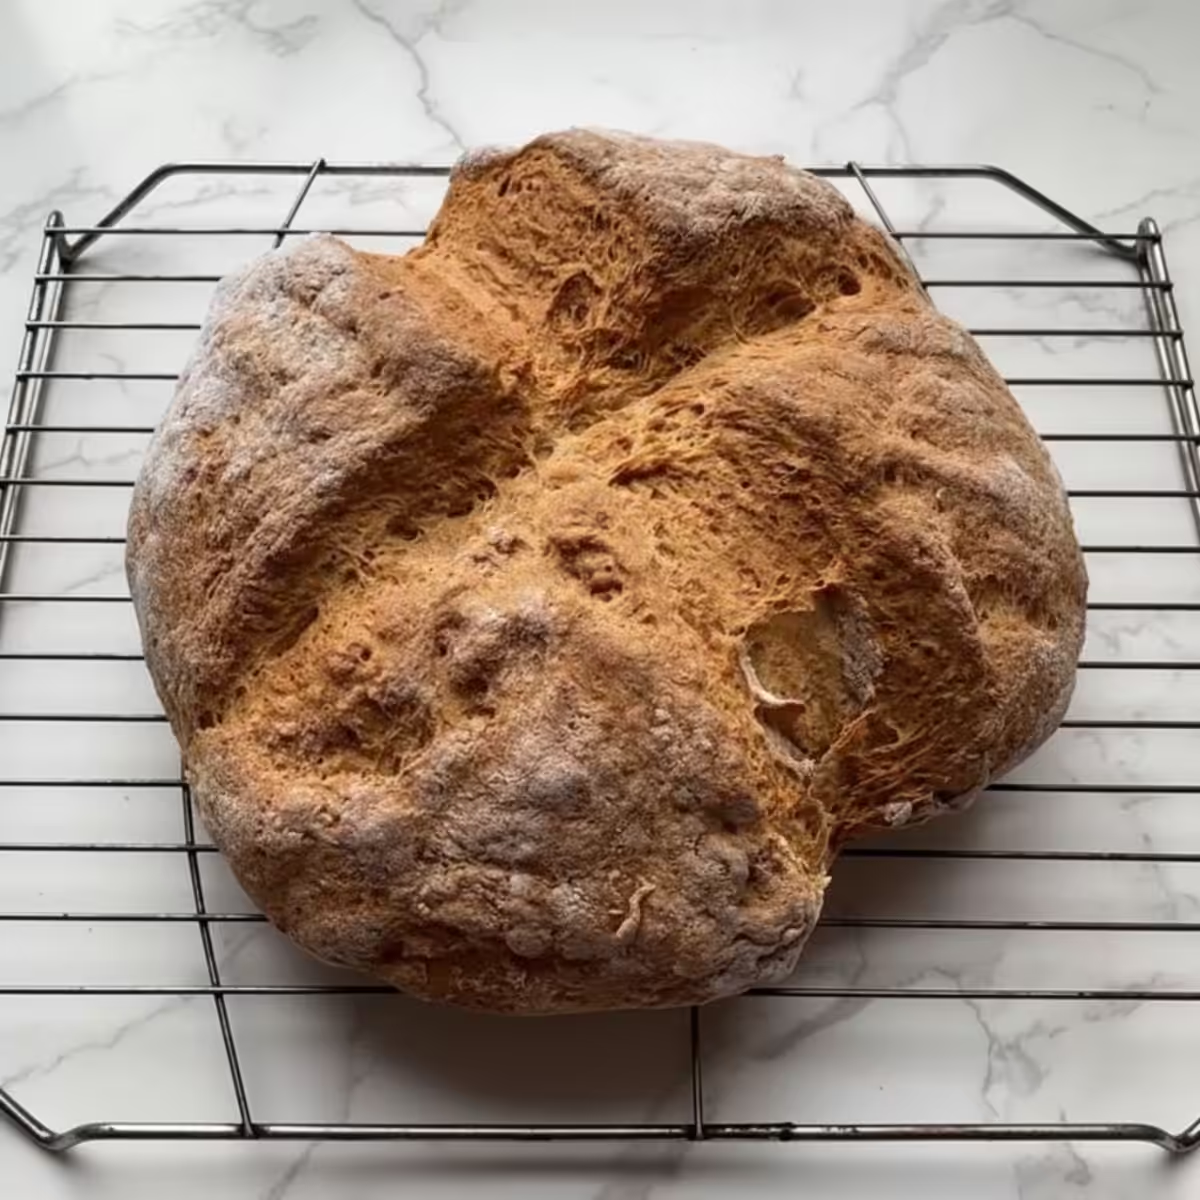
Bake the bread in the preheated oven for 40 to 45 minutes. The loaf should be deep golden brown, and it will sound hollow when tapped on the bottom. For the most accurate doneness test, insert an instant-read thermometer into the center; it should register 190°F to 200°F.
Transfer the baked bread to a wire rack and cool for at least 30 minutes before slicing. I understand the temptation to tear into a warm loaf immediately, but patience rewards you with clean slices and properly set texture.
Achieving the Perfect Texture Every Time
Even with a forgiving recipe like this one, attention to a few key details separates good soda bread from exceptional soda bread.
The Cold Ingredient Rule
Cold butter and cold buttermilk are non-negotiable. Cold butter creates steam pockets as it melts in the oven, contributing to a lighter, flakier interior. Cold buttermilk slows the initial reaction between the acid and baking soda, giving you a few extra moments to shape the loaf before the gas production peaks.
Handling with Care
Every touch of the dough risks deflating the carbon dioxide bubbles that provide the rise. Mix until the flour is just moistened—a few streaks of flour are fine. Shape gently and quickly. A rough, craggy exterior is authentic and desirable.
The Importance of the Cross Cut
Do not skip or shallowly score the top. A deep X cut allows the bread to expand properly and ensures the center bakes through. Without it, the bread may split unpredictably along the sides and remain dense in the middle.
Cooling Completely
Soda bread continues to cook from residual heat after leaving the oven. Slicing too early releases steam prematurely and can result in a gummy, underdone texture. Allow the loaf to rest on a wire rack for at least 30 minutes, though an hour is even better.
Recipe Variations and Creative Adaptations
While classic Irish soda bread is beloved for its simplicity, this versatile recipe welcomes creative interpretation.
Sweet Variations
Traditional Spotted Dog: Add 1 cup of raisins or currants to the dry ingredients before adding the buttermilk. For extra flavor, plump the raisins in hot water for 10 minutes, then drain and pat dry before adding.
Honey Oat Soda Bread: Replace 1 cup of the all-purpose flour with 1 cup of rolled oats. Add 2 tablespoons of honey to the buttermilk before incorporating. The oats create a heartier texture and nutty flavor.
Cinnamon Raisin Swirl: Add 1 tablespoon of ground cinnamon and ¼ cup of sugar to the dry ingredients. Fold in 1 cup of raisins. The result tastes like a less labor-intensive version of cinnamon raisin bread.
Savory Variations
Cheddar and Chive: Reduce the butter to 3 tablespoons. Add 1 cup of shredded sharp cheddar cheese and ¼ cup of fresh chopped chives to the dry ingredients. The cheese melts into savory pockets throughout the bread.
Rosemary and Sea Salt: Add 2 tablespoons of fresh chopped rosemary to the dry ingredients. Before baking, sprinkle the top of the loaf with flaky sea salt for a beautiful finish and salty crunch.
Everything Bagel Soda Bread: Add 2 tablespoons of everything bagel seasoning (poppy seeds, sesame seeds, dried garlic, dried onion, and salt) to the dry ingredients. The result is a savory loaf perfect for sandwiches or alongside cream cheese.
Dietary Adaptations
Vegan Irish Soda Bread: Substitute the butter with cold vegan butter or refined coconut oil. Replace the buttermilk with a mixture of unsweetened plant-based milk (such as oat or soy) combined with 1 tablespoon of apple cider vinegar or lemon juice. Allow this mixture to sit for 5 to 10 minutes to thicken and sour before using. The texture will be slightly different but still delicious.
Gluten-Free Version: Substitute the all-purpose flour with a high-quality 1:1 gluten-free baking flour blend that contains xanthan gum. The dough will feel stickier and more delicate; you may need to pat it into shape rather than handling it extensively. Bake as directed, checking for doneness at the 35-minute mark as gluten-free flours can brown more quickly.
Whole Wheat Option: Replace up to half of the all-purpose flour with whole wheat flour for a nuttier flavor and heartier texture. Whole wheat flour absorbs more liquid, so you may need to add an extra 2 to 4 tablespoons of buttermilk. Using 100% whole wheat will result in a significantly denser loaf.
Serving Suggestions and Storage Tips
How to Serve Irish Soda Bread
Traditional Irish soda bread shines brightest the day it is baked, served slightly warm with a generous pat of salted butter melting into each slice. It is the perfect accompaniment to soups and stews—try it alongside a hearty potato leek soup, beef and Guinness stew (using non-alcoholic stout for a family-friendly version), or classic Irish colcannon.
For breakfast or tea time, toast slices and serve with jam, marmalade, or clotted cream. The bread’s slight tang pairs beautifully with sweet toppings.
Soda bread also makes excellent sandwiches. Try it with smoked salmon and cream cheese, thick slices of roasted turkey and cranberry sauce, or simply with sharp cheddar and apple slices for a satisfying lunch.
Proper Storage Methods
Soda bread lacks the preservatives of commercial bread and is best enjoyed within two days of baking. Store the completely cooled loaf wrapped tightly in foil or beeswax wrap at room temperature. Do not refrigerate, as the cool temperature accelerates staling.
Freezing Instructions
This bread freezes exceptionally well. Allow the loaf to cool completely, then wrap it tightly in plastic wrap followed by a layer of aluminum foil. Freeze for up to three months. To serve, thaw at room temperature still wrapped to prevent condensation from softening the crust. Refresh the loaf in a 350°F oven for 8 to 10 minutes to restore the crust’s crispness.
Reviving Day-Old Bread
If your bread has lost its initial freshness, do not discard it. Slice and toast the pieces, then serve with butter and jam. Alternatively, cube day-old bread and toast the cubes for homemade croutons—they add wonderful texture to salads and soups. You can also pulse stale soda bread in a food processor to make breadcrumbs for coating chicken or topping casseroles.
Frequently Asked Questions
Why did my soda bread turn out dense and heavy?
The most common cause is overmixing the dough. Once the buttermilk meets the baking soda, the leavening reaction begins immediately. Overworking the dough deflates the gas bubbles and develops gluten, leading to a compact texture. Next time, mix just until the ingredients come together, and handle the dough as little as possible.
Can I use baking powder instead of baking soda?
Baking powder is not a direct substitute in this recipe. Traditional Irish soda bread relies on the reaction between baking soda and the acid in buttermilk. Using baking powder would require reformulating the recipe entirely and would not produce the same characteristic texture and tang.
What if I don’t have buttermilk?
Creating a buttermilk substitute is simple and reliable. For each cup of milk needed, place 1 tablespoon of lemon juice or white vinegar in a measuring cup, then fill with milk to the 1-cup line. Stir and let stand for 5 to 10 minutes until it thickens slightly. Whole milk yields the best results, but any milk you have on hand will work.
Can I make this bread in a cast iron skillet?
Absolutely. Baking the loaf in a preheated cast iron skillet creates an even crisper crust. Place the skillet in the oven while it preheats, then carefully transfer the shaped dough onto the hot surface. The intense bottom heat promotes excellent oven spring and browning. You can also bake the dough in a lightly greased cast iron skillet without preheating for a softer crust.
Why is my bread crumbly and falling apart?
If your bread is excessively crumbly, the dough may have been too dry when mixed. Next time, add buttermilk gradually until the dough comes together without dry pockets. Alternatively, the bread may have overbaked, drying out the interior. Check for doneness with a thermometer to avoid overbaking.
Can I double this recipe?
Yes, you can easily double the recipe to make two loaves. Divide the dough into two rounds and bake on separate baking sheets, or bake one loaf and freeze the second for later. Baking time may increase slightly if both loaves are in the oven simultaneously.
Join the Soda Bread Baking Tradition
There is something deeply satisfying about mastering a recipe that has fed families for generations. This Amazingly Easy Irish Soda Bread connects you to a rich culinary heritage while requiring only the simplest ingredients and techniques. It is the bread you will turn to when you want homemade comfort without the fuss, the loaf that will earn you compliments whenever you share it.
When you bake this bread, I would love to hear about your experience. Did you try one of the variations? Discover a new combination that became your signature? Share your results in the comments below and rate the recipe to help other home bakers find their way here.
For more no-yeast baking inspiration, explore our collection of quick bread recipes, including Classic Brown Soda Bread, Honey Whole Wheat Soda Bread, and Cinnamon Raisin Brown Soda Bread. Each recipe builds on the same simple technique while offering entirely new flavor experiences.
Happy baking, friends. May your crust be crisp, your crumb tender, and your kitchen filled with the warm, inviting aroma of freshly baked bread.
Did you make this recipe? Tag us on social media using #AmazinglyEasySodaBread and leave a star rating below—your feedback helps others discover the joy of homemade bread!

Amazingly Easy Irish Soda Bread
Ingredients
Equipment
Method
- Preheat oven to 400°F (200°C). Line a baking sheet with parchment paper.
- In a large bowl, whisk together flour, baking soda, and salt. Add cold cubed butter and work into flour with fingertips until mixture resembles coarse meal with some pea-sized butter pieces remaining.
- Make a well in the center and pour in cold buttermilk. Stir with a fork just until dough comes together; it will be shaggy and slightly sticky. Do not overmix.
- Turn dough onto a lightly floured surface. With floured hands, gently shape into a round loaf. Do not knead.
- Transfer to prepared baking sheet. Using a sharp knife, cut a deep X across the top, cutting about halfway through the loaf.
- Bake for 40-45 minutes until deep golden brown and loaf sounds hollow when tapped. Internal temperature should reach 190-200°F.
- Transfer to wire rack and cool at least 30 minutes before slicing.